Social Media Image Sizes
Posted by Savana Price on 29th May 2019
Social Media Image Sizes
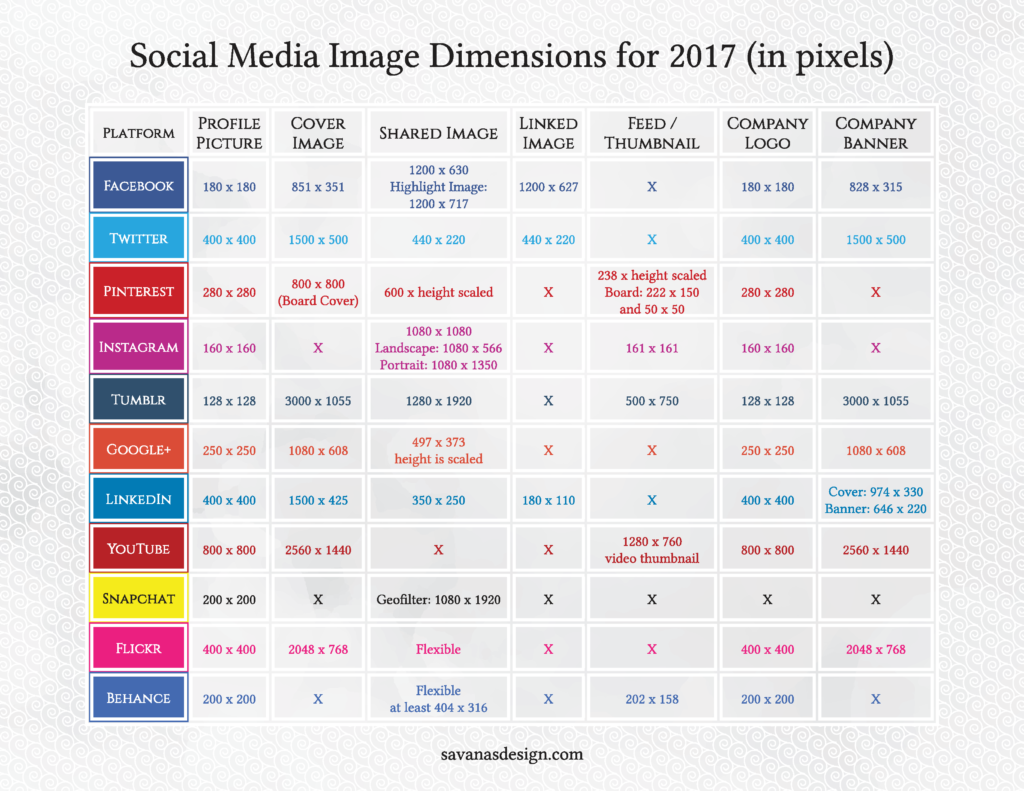
Use our social media image sizes 2017 guide as a cheat sheet to reference on your next social media design. Today I will talk about the different social media image size dimensions for 2017 on each social media platform and some tips and tricks when designing for them.
There are great infographics out there similar to our social media image sizes 2017 chart that are helpful when trying to find the correct dimensions for your image. Be careful as some dimensions can be confusing or have updated since. I personally had trouble finding image size guides that were exact to one another. Although all of these should work just fine, if you find one that doesn’t please comment below and I will update this guide.

Latest Social Media Image Sizes 2017 in Pixels:
Profile photo: 180 x 180
Cover image: 851 x 351
Business page cover photo: 828 x 315
Highlight image: 1200 x 717
Link image: 1200 x 627
Shared image: 1200 x 630
Profile photo: 400 x 400 (displays as 200 x 200)
Cover image: 1500 x 500
Shared image: 440 x 220
Profile photo: 280 x 280
Pins in feed: 238 x height scaled
Expanded pins: 600 x height scaled
Board cover: 800 x 800
Board display: 222 x 150 for large thumbnails
50 x 50 for smaller thumbnails
Profile photo: 160 x 160
Photo thumbnails: 161 x 161
Photo size: 1080 x 1080
Landscape image: 1080 x 566
Portrait image: 1080 x 1350
Tumblr
Profile photo: 128 x 128
Shared image: 1280 x 1920
Image in feed: 500 x 750
Google+
Profile photo: 250 x 250
Cover image: 1080 x 608
Shared image: 497 x 373 height is scaled
Profile photo: 400 x 400
Profile cover image: 1500 x 425
Company logo: 400 x 400
Career cover photo: 974 x 330
Company banner image: 646 x 220
Link image: 180 x 110
Shared image: 350 x 250
YouTube
Profile photo: 800 x 800
Channel cover image: 2560 x 1440
Custom video thumbnail: 1280 x 760
Snapchat
Geofilter: 1080 x 1920
Flickr
Profile photo: 400 x 400
Cover photo: 2048 x 768
Behance
Profile photo: 200 x 200
Thumbnail images: at least 404 x 316 (displays at 202 x 158)
Tips and Tricks
One of my favorite tricks, especially when designing on mac is to double over the dimensions so that when you post your image online they will be crisp and clear. Some of these dimensions are already sized up to be clean when uploaded, but it is never a bad idea.
If doubling makes the file too large, feel free to add 300-400 pixels on the length and width and this should do the trick.
Another key point is to always save out in PNG and make sure your images are set to RGB.
If you have to use a JPG make sure your RGB settings are correct and try to save out bigger than required. However, most of the time JPGs will look poor in quality because some platforms like Twitter, tend to compress it a lot. The artifacts are terrible especially at 72 dpi.
Additionally, think about how your image will be used. For example, if you want your image to be shared a lot, you may want to design with the platform’s sharing dimension in mind.
Creating an image to share cross-platform can be very tricky, especially if you like to share on Instagram. However, if you start with an Instagram size like 1080 x 1080 pixels it is much easier to then share on Facebook, Twitter, Pinterest, and other platforms. Again, remember to double over dimensions if possible.
Adding text can allow for more artifacts, especially on Twitter so be careful and keep dimensions and the saving out format in mind. For the most part JPG format tends to be terrible with text. Provided that you are text heavy or only using a couple of colors, GIF format may actually work well.

